The Waiting Game
Colonisation is the part of the process where your patience gets tested. You've done everything right. sourced clean grain, hydrated it precisely, sterilised it thoroughly, inoculated it cleanly. and now you wait. The mycelium is in there, doing its work, and there's a powerful temptation to check constantly, pick bags up, hold them to the light, shake them, poke them. Resist that temptation. Every time you handle a bag unnecessarily, you risk introducing contamination through the filter patch, disturbing the growing mycelium, or creating condensation from temperature changes.
I check my bags once per day. That's it. A quick visual inspection from outside the bag, a note in my log, and back on the shelf. The mycelium doesn't need your encouragement. It needs stable conditions and to be left alone.
Incubation Conditions
Temperature: 24°C Target
The optimal incubation temperature for most commonly cultivated species on rye grain is 22-26°C, with 24°C being the sweet spot I've settled on after extensive testing. At this temperature, mycelial growth rate is near maximum while contamination organisms (which also grow faster at higher temperatures) are not given an excessive advantage.
Colonisation Speed by Temperature
20°C: 15-19 days, low contamination risk
22°C: 12-16 days, low contamination risk
24°C: 10-13 days, moderate contamination risk
26°C: 9-12 days, elevated contamination risk
28°C: 8-11 days, significantly elevated contamination risk
30°C+: Not recommended. bacterial growth accelerates faster than mycelial growth
Data from Pleurotus ostreatus and Hericium erinaceus on rye, n=200+ bags.
The temptation to push temperature higher for faster colonisation is understandable but counterproductive above 26°C. Between 24°C and 28°C, you gain perhaps 2 days of colonisation speed but your contamination rate roughly doubles. That's a terrible trade-off. At 24°C, my average contamination rate from all sources is about 3-4%. At 28°C, it jumps to 7-9%. The extra 2 days aren't worth losing one bag in ten.
Maintaining Temperature
I use a dedicated incubation space. a cupboard in my spare room with a tube heater (the kind used in greenhouses, 80W) controlled by an Inkbird ITC-308 thermostat (about £25). The thermostat probe sits between the bags, measuring air temperature. The heater kicks on at 23°C and off at 25°C, maintaining a stable 24°C with minimal fluctuation. The whole setup cost about £50 and has been running for two years without issues.
Avoid placing bags on direct heat sources. shelves above radiators, on top of the PC while it's cooling, or in airing cupboards with immersion heaters. These create temperature gradients within the bag: the bottom is hot, the top is cool. Mycelium grows unevenly, and the hot zone is where bacteria take hold first.
Light: Dark Is Fine
During colonisation, light is irrelevant. Mycelium colonising grain does not respond to light in any meaningful way. it's growing through an opaque substrate and has no photoreceptors active at this stage. I incubate in total darkness because my cupboard has no window, not because darkness is a requirement. If your incubation space has ambient light, don't worry about it. Don't go out of your way to exclude it, and don't leave bags in direct sunlight (which would cause temperature spikes).
Fresh Air Exchange (FAE)
This is often overlooked. Mycelium is aerobic. it needs oxygen and produces carbon dioxide. The filter patches on your grain bags are designed to allow gas exchange, and in most situations they're sufficient. But if you're incubating 20+ bags in a small, enclosed space, CO2 can build up to levels that slow colonisation.
I open my incubation cupboard once per day during my inspection round. That 60 seconds of open-door air exchange is more than enough to refresh the atmosphere inside. If you're incubating in a sealed plastic tub or very small enclosed space, crack the lid for a few minutes daily. You don't need a fan or forced air. just enough passive exchange to prevent CO2 stagnation.
CO2 Indicator
If you notice colonisation slowing uniformly across all bags in a batch. not stalling, but slowing. and the temperature is correct, suspect CO2 buildup. The easy test: open the incubation space for 10 minutes, reseal, and check again in 48 hours. If growth rate picks up, you need better ventilation. I added two small passive vents (drilled holes covered with micropore tape) to the back of my incubation cupboard after this exact scenario. Problem solved permanently.
Daily Monitoring
My daily monitoring routine takes about 5 minutes for 20 bags. Here's exactly what I look for:
Visual Inspection
Pick up each bag (gently) and look at it from all sides. You're checking three things:
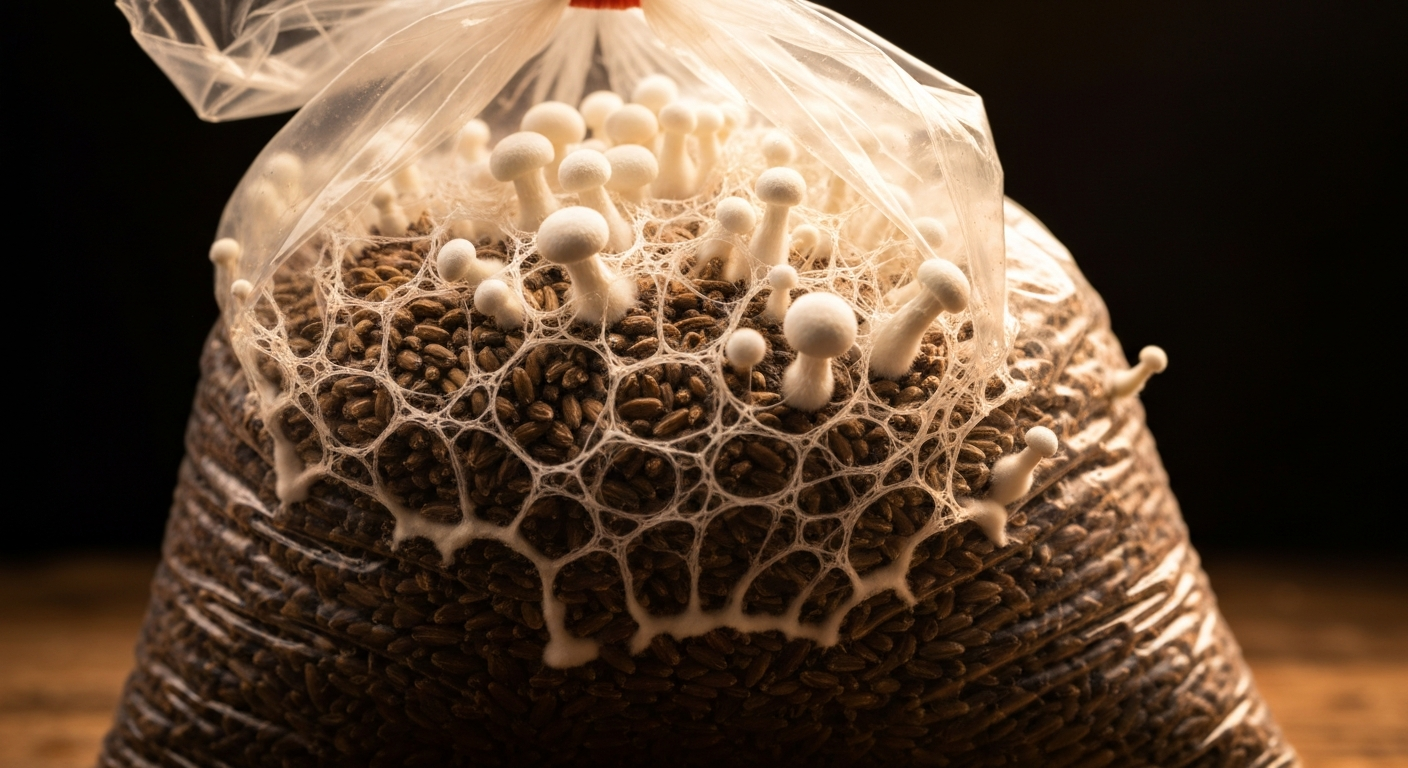
- Mycelium growth: White, fluffy growth expanding from the inoculation points. It should be visibly larger each day during active colonisation. roughly 2-5mm of radial growth per day at 24°C, depending on species and inoculant vigour.
- Contamination: Any colour that isn't white. Green (Trichoderma), black (Aspergillus), yellow/orange (bacterial), pink (Neurospora). if you see any of these, isolate the bag immediately. More on identification in the troubleshooting chapter.
- Moisture: Look for excessive condensation on the inside of the bag. Some condensation is normal. the grain is warm and moist, and the bag wall is slightly cooler. But pools of standing water or heavy fog inside the bag indicate over-hydration or a temperature gradient. If you see it in one bag out of twenty, it's probably that specific bag. If you see it in most bags, your incubation temperature is too variable.
The Log
I keep a simple spreadsheet. Each row is a bag, and I note the date, estimated colonisation percentage (visual estimate: 10%, 25%, 50%, 75%, 100%), any observations (growth speed, appearance, condensation), and any actions taken (break-and-shake, isolation, disposal). This takes 30 seconds per bag and gives me data that's invaluable for troubleshooting and process improvement.
You don't need to be precise with the percentage estimates. I'm not measuring mycelial coverage with calipers. I'm looking at the bag and thinking "about a quarter of the visible grain is colonised". that's 25%. It's approximate, but over hundreds of bags, the averages are remarkably consistent and useful for identifying trends.
Monitoring Log Template
Example row:
B-247 | 2026-02-15 | P. ostreatus | LC 10ml | 5% | 15% | 30% (B&S) | 65% | 100% | Fast, clean, ready D14
Break-and-Shake at 30%
Break-and-shake is the technique of physically breaking up the colonised grain mass and redistributing it through the bag at a specific point during colonisation. It's one of the most impactful things you can do to speed up full colonisation, and the timing matters enormously.
Why 30%?
At 30% colonisation, the mycelium has established itself firmly enough that it can survive the disruption of being broken apart. Before 20%, the mycelium is too fragile. breaking it up can set colonisation back significantly or even stall it completely. After 50%, the benefit diminishes because the mycelium is already approaching the remaining grain from multiple fronts.
The 30% mark is where the maths work best. Breaking the bag at 30% and redistributing the colonised grains throughout the uncolonised mass essentially creates dozens of new inoculation points. Instead of mycelium growing outward from 3-4 original spots, it's now growing outward from 30-50 spots. The effect on colonisation speed is dramatic.
Break-and-Shake Impact on Colonisation Time
Break-and-shake at 20%: 11-14 days (marginal improvement, risk of stall)
Break-and-shake at 30%: 9-11 days (significant improvement, low risk)
Break-and-shake at 50%: 10-12 days (modest improvement, no risk)
Break-and-shake at 30% + again at 60%: 8-10 days (best result but higher handling)
Data from 150+ bags, Pleurotus ostreatus, LC inoculation, 24°C incubation.
The Technique
When you see roughly 30% of the visible grain covered in white mycelium, pick up the bag and massage it firmly. The colonised mass will be stuck together. break it apart with your hands through the outside of the bag. You shouldn't need to open the bag. Work the grain until individual colonised kernels are separated and distributed throughout the uncolonised grain. Shake the bag vigorously for 5-10 seconds to complete the mixing.
The bag will look terrible immediately after. the mycelium is disrupted, the grain is loose, and there's no visible white growth. Don't panic. Within 48-72 hours, you'll see new mycelial growth appearing at dozens of points throughout the bag. It's enormously satisfying to watch.
Only Break-and-Shake Clean Bags
If a bag shows any sign of contamination. any colour other than white, any off smell through the filter, any suspicious wet spots. do not break-and-shake it. Breaking and shaking a contaminated bag distributes the contaminant throughout the entire grain mass, turning a localised problem into a total loss. Inspect carefully before you shake. If in doubt, wait another day and inspect again.
Healthy vs Unhealthy Mycelium
Learning to read your bags is a skill that develops over time, but here are the markers I look for.
Healthy Mycelium
- Bright white colour. clean, pure white with no yellow, grey, or translucent patches
- Fluffy, ropey texture. rhizomorphic growth (thick strands reaching outward) is ideal. Tomentose growth (fluffy, cotton-like) is fine too, just typically slower.
- Consistent radial expansion. growing outward at a steady rate from all inoculation points. Growth should be symmetrical around each point.
- Clean grain smell. if you can smell through the filter, healthy colonising grain has an earthy, mushroomy smell. Not sour, not sweet, not chemical.
- Normal condensation. light misting on the bag interior, not droplets or pools
Warning Signs
- Yellow or amber metabolites: Mycelium sometimes exudes yellowish liquid when stressed. A small amount around the inoculation point isn't alarming. it's a defence response and often resolves. Large patches of yellow or amber across the bag indicate significant stress or early-stage bacterial contamination.
- Grey or translucent mycelium: Healthy mycelium is opaque white. Grey, glassy, or translucent growth is often a sign of bacterial contamination underlying the mycelial growth. The mycelium is growing, but it's growing on compromised substrate.
- Uneven growth: If mycelium is expanding rapidly on one side of the bag but stalled on the other, the temperature in your incubation space is probably uneven, or there's a moisture gradient in the bag.
- Sour smell: If you can detect a sour or yeasty odour through the filter patch, bacterial contamination is likely present even if you can't see it yet. Isolate the bag and monitor for 48 hours. If the smell intensifies, bin it.
Take Reference Photos
Photograph your bags at the same time each day, same angle, same lighting. After a few batches, you'll have a visual reference library of what healthy colonisation looks like at every stage. This is far more useful than any written description, because you'll be comparing your current bags to your own previous successes, not to someone else's photos taken under different conditions. I keep a folder on my phone organised by species and batch number. It's saved me from unnecessary panic several times.
Stall Recovery via Thermal Cycling
Colonisation stalls happen. The mycelium reaches a certain point. often 40-60%. and just stops growing. Days pass with no visible progress. The bag doesn't smell off, there's no visible contamination, but the mycelium isn't advancing. This is one of the most frustrating problems in grain work, and one I've spent considerable time troubleshooting.
Why Stalls Happen
The most common causes in my experience are:
- CO2 buildup around the bag (especially in enclosed spaces)
- Moisture issues. the grain is slightly too dry in the uncolonised zone
- Culture vigour. the inoculant was weak, old, or too many generations from the original isolate
- Temperature stagnation. the incubation temperature is too stable, which sounds counterintuitive but can cause the mycelium to enter a resting state
Thermal Cycling Protocol
The technique that works best for me is thermal cycling: deliberately varying the incubation temperature over a 48-72 hour period to shock the mycelium back into active growth.
Thermal Cycling Protocol for Stalled Bags
Step 2: Return to standard incubation temperature (24°C) for 24 hours
Step 3: If no improvement, repeat the cycle once more
Step 4: If still stalled after two cycles, break-and-shake (if not already done)
Success rate: ~70% of stalled bags resume colonisation after thermal cycling
Remaining 30%: typically underlying contamination or exhausted culture
The temperature drop seems to trigger a stress response in the mycelium. when it returns to the warmer temperature, it resumes growth with renewed vigour. I don't have a rigorous scientific explanation for why this works, but it does, and the data supports it consistently. About 70% of my stalled bags resume normal colonisation after one or two thermal cycles.
The remaining 30% are typically lost causes. when I investigate (by opening and inspecting), most have underlying bacterial contamination that wasn't visible from outside the bag, or the culture has simply lost vigour from too many generations of transfer.
Colonisation Timeline
Here's what a typical colonisation timeline looks like for my standard protocol (LC inoculation, 10 ml, rye grain, 24°C, with break-and-shake at 30%):
Typical Colonisation Timeline (P. ostreatus, LC, 24°C)
Day 3-4: First visible growth. Small white patches around inoculation points, 2-5mm diameter.
Day 5-6: Growth accelerating. Patches expanding to 10-20mm diameter. Multiple inoculation points visible.
Day 7: Approximately 25-30% colonised. Break-and-shake day.
Day 8-9: Post-shake recovery. New growth points appearing throughout the bag.
Day 10-11: Rapid expansion. 60-75% colonised. Individual colonies merging.
Day 12-13: 90-100% colonised. Last uncolonised patches disappearing.
Day 14: Fully colonised. Allow 2-3 extra days for consolidation before use.
That's an ideal timeline. Reality varies. Slower cultures, cooler temperatures, sub-optimal hydration, or a missed break-and-shake can push this to 18-21 days. Faster cultures (especially P. ostreatus, which is vigorous) sometimes finish in 10-11 days. The timeline above is an average, not a guarantee.
Consolidation
Once a bag appears 100% colonised, I leave it for an additional 2-3 days before using it for spawning or transfer. This consolidation period allows the mycelium to fully penetrate the last few uncolonised kernels that might be hidden in the centre of the bag, invisible from outside. Jumping to use the bag the moment it looks done risks transferring partially colonised grain, which has a higher contamination risk during spawn-to-substrate transfer.
You'll notice the bag becomes slightly firmer during consolidation as the mycelial network matures and binds the grain more tightly. This is a good sign. it indicates a robust, well-established culture that's ready for the next step.
The Shake Test
Before using a fully colonised bag, try to shake it. A properly colonised bag will resist breaking apart. the entire grain mass is bound into a solid block by mycelium. If it breaks apart easily into individual grains, it's not fully colonised internally, even if the surface looks 100% white. Give it another 3-4 days. A strong, consolidated block means the mycelium has penetrated deeply, and that bag is ready to perform.