The Harsh Truth About Contamination
If you've been growing mushrooms for any length of time, you've dealt with contamination. Full stop. I don't care how clean your technique is or how expensive your flow hood was. at some point, something green or slimy or foul-smelling is going to show up in one of your bags.
I've lost entire batches. Fifteen bags in one go, once. That was a bad week. But here's the thing. every contamination teaches you something, if you bother to look at it properly instead of just chucking the bag in the bin and pretending it didn't happen.
This chapter covers every type of contamination I've encountered in rye grain spawn, what causes each one, and. most importantly. what you can actually change to stop it happening again.
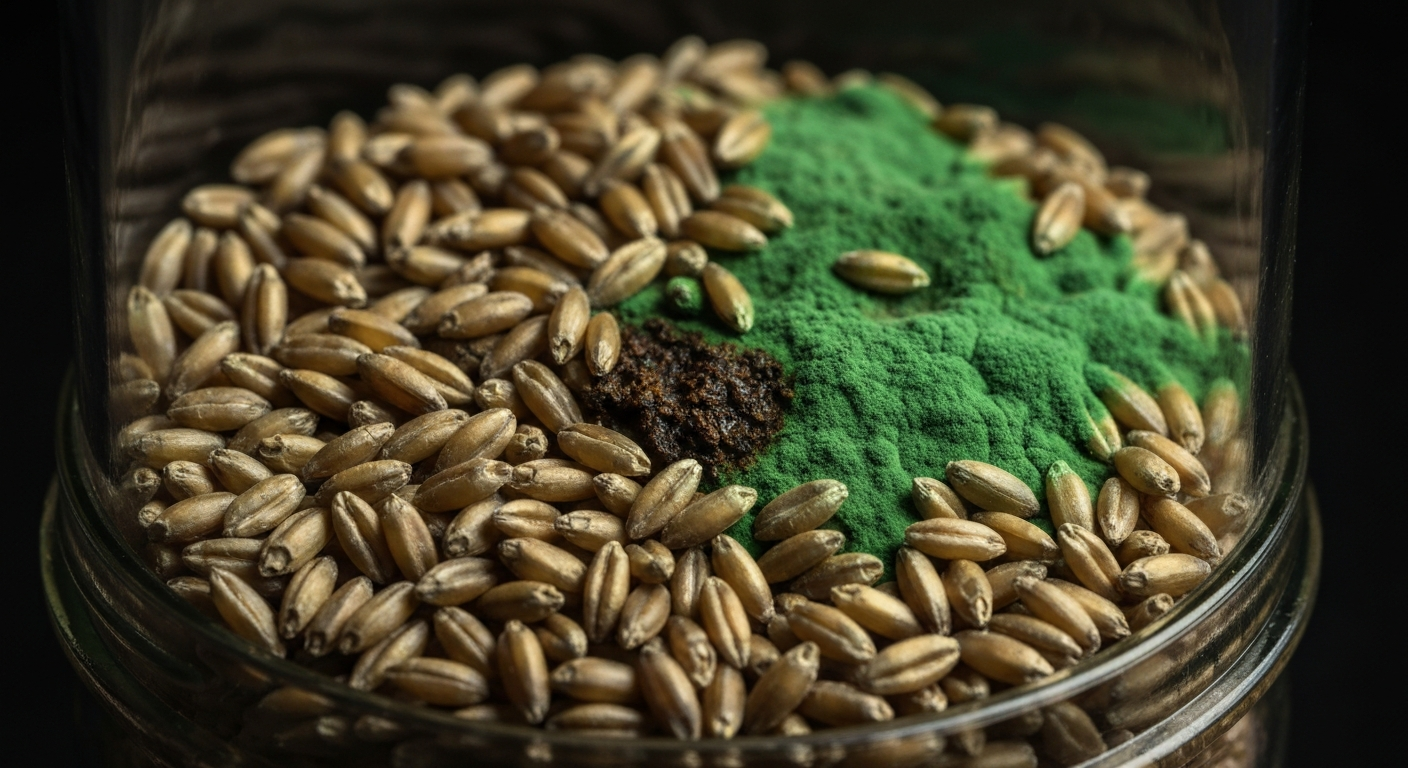
Trichoderma (Green Mould)
Trichoderma is the one everyone dreads, and for good reason. It's aggressive, fast-spreading, and once it gets established in a bag, there's genuinely nothing you can do to save it. I've tried cutting out affected sections, I've tried salt barriers, I've tried isolating bags. none of it works reliably. Trich wins.
What It Looks Like
Starts as white fluffy patches that look almost identical to healthy mycelium. Within 24-48 hours, those patches turn bright green as the mould sporulates. The green is unmistakable. it's a vivid forest green, not the blue-green of Penicillium. If you're not sure, wait a day. Trich gets greener. Mycelium doesn't.
Common Causes in Rye Spawn
- Insufficient sterilisation. By far the most common cause. If you're running 90 minutes at 15psi instead of 120, you're rolling the dice. I tracked my contamination rates over 200 bags and the data is clear: 90min = 12% contamination, 120min = under 2%. Those extra 30 minutes aren't optional.
- Wet grain. Over-hydrated rye (above 56% moisture content) creates the perfect environment for trich. The excess moisture pools at the bottom of the bag and becomes a bacterial breeding ground, which weakens the grain's resistance.
- Poor sterile technique during inoculation. Working too fast, not flame-sterilising needle tips between bags, or inoculating in a room with drafts.
- Contaminated spawn source. If your liquid culture or agar is already carrying trich spores, nothing else matters. Always test your LC on agar before using it for a full batch.
Critical Warning
Never open a bag with suspected trichoderma indoors. Trich produces millions of spores and opening one contaminated bag can contaminate your entire growing space. Take it outside, seal it in a bin bag, and dispose of it. Clean your growing area with diluted bleach afterwards.
Bacterial Contamination
Bacterial contamination is sneakier than trich because you often can't see it. you smell it first. That sour, fermented, almost beer-like smell? That's bacteria. And by the time you can smell it through the filter patch, it's been growing for days.
What It Looks Like
Wet, slimy patches on the grain. The rye kernels look darker and shinier than normal. Sometimes you'll see milky liquid pooling at the bottom of the bag. The mycelium near bacterial areas looks thin and grey instead of thick and white.
Common Causes
- Over-hydrated grain. This is cause number one. If your grain fails the dry-surface test (see Chapter 2), bacteria will find it before mycelium does.
- Burst kernels from over-soaking. Cracked rye releases starch into the surrounding water, creating a bacterial buffet. If your soak went too long (over 20 hours at warm temperatures), this is likely what happened.
- Loading bags while grain is still warm. If you inoculate grain that hasn't fully cooled to room temperature after sterilisation, you're creating a warm, moist environment that bacteria love.
- Dirty water source. I use tap water that's been sitting out for 24 hours to off-gas chlorine. Some growers use distilled or RO water. Either way, don't use water straight from a garden hose or a sketchy tap.
Pro Tip
If you consistently get bacterial contamination, check your pressure cooker's seal. A worn gasket can drop internal pressure below the true 15psi needed for sterilisation, even if the gauge reads correctly. Replace gaskets annually or sooner if they show wear.
Wet Rot
Wet rot is basically bacterial contamination's aggressive cousin. It happens when excess moisture sits in the bottom of your grain bags and creates anaerobic conditions. The grain at the bottom turns dark, mushy, and develops a distinctive rotting smell that's different from the sour smell of regular bacteria. it's more like wet cardboard left in a puddle for a week.
Prevention
This one's entirely preventable:
- Hit your target moisture content (50-54%) precisely
- Do the dry-surface test before loading bags
- Don't overfill bags. 2/3 capacity maximum
- Store inoculated bags on their sides for the first few days to distribute moisture
- Ensure your filter patches aren't blocked or touching wet surfaces in the pressure cooker
Slow or Stalled Colonisation
When mycelium stops growing partway through colonisation, the panic sets in. But stalls aren't always contamination. sometimes the mycelium just needs a nudge.
Common Causes and Fixes
Stall Diagnosis
Temperature too high (>28°C): Mycelium weakens above 28°C, move to cooler area
Dry grain: Under-hydrated grain can't support fast colonisation
Poor genetics: Weak culture = slow growth, try a different source
CO2 buildup: Ensure filter patches aren't blocked
Natural stall at 60-70%: Try thermal cycling (below)
The Thermal Cycling Trick
When bags stall at 60-70% colonisation. which happens more often than you'd think. I drop the temperature to 15°C for 12 hours, then bring it back up to 24°C. The temperature swing triggers a metabolic response in the mycelium that often restarts aggressive growth. I've recovered dozens of stalled bags this way. It doesn't always work, but it works often enough that I do it every time before giving up on a bag.
Grain Clumping
If your grain clumps together into solid masses instead of separating freely when you shake the bag, one of two things happened:
- The grain was too wet when loaded. Excess surface moisture acts like glue when the grain is compressed in the pressure cooker. Solution: always do the dry-surface test and drain longer.
- You overcooked the grain. Rye that's been soaked too long or sterilised at too high a temperature develops a gelatinous starch layer on the outside of each kernel. This starch glues the kernels together. Solution: cold soak (not hot), and stick to 15psi. don't go higher thinking "more pressure = more sterile."
Clumped grain isn't necessarily contaminated, but it colonises slowly and unevenly because mycelium can't spread across individual kernel surfaces. It also makes break-and-shake impossible, which adds a week or more to your colonisation time.
Save It or Bin It?
The hardest skill in mycology isn't sterile technique. it's knowing when to give up on a bag. Here's my decision framework after years of trying to save things that should've been binned days earlier:
Decision Framework
. Any green mould (trichoderma). no exceptions
. Foul, rotting smell
. Slimy grain with milky liquid pooling
. Black or orange spots (Aspergillus or lipstick mould)
WATCH for 48 hours:
. Slight sour smell but grain looks normal
. Mysterious white fluffy growth (could be mycelium or cobweb)
. Growth stalled but no visible contamination
SAVE and adjust:
. Slow colonisation with healthy white mycelium
. Minor grain clumping
. Stall at 60-70% (try thermal cycling)
I know it's gutting to bin a bag you spent time and money preparing. But keeping contaminated bags "just in case" is how you contaminate your entire growing space. One bag of trich costs you £2 in grain. One contaminated growing room costs you weeks of failed batches. Do the maths.
Prevention Checklist
After 200+ bags and more contamination than I'd like to admit, here's the checklist I run through before every single batch. I've printed this out and stuck it on the wall next to my PC. Every step gets ticked off.
Pre-Batch Checklist
☐ Rye sourced from agricultural supplier (not pet store)
☐ Grain rinsed until water runs clear
☐ Cold soak at 12-16°C for 18 hours
☐ Drained for minimum 20 minutes
☐ Dry-surface test passed
Loading:
☐ Bags filled to 2/3 capacity only
☐ Air pocket left at top
☐ Filter patches unobstructed
☐ Bags not touching each other in PC
Sterilisation:
☐ PC gasket inspected
☐ 15psi reached before starting timer
☐ 120 minutes minimum at 15psi
☐ Cooled overnight to room temperature
Inoculation:
☐ SAB or flow hood cleaned with 70% ISO
☐ LC/agar tested on agar plate first
☐ Needle flame-sterilised between each bag
☐ Injection port wiped with ISO before and after
☐ Work done in still air (no fans, no drafts)
Incubation:
☐ Temperature stable at 22-25°C
☐ No direct sunlight
☐ Daily visual inspection from day 3
That's the whole troubleshooting chapter. The reality is that most contamination comes from two things: under-sterilised grain and over-hydrated grain. Get those right and you'll solve 90% of your problems before they start. The other 10% is sterile technique and genetics. and those improve with practice.
If you're just getting started, go back to Chapter 1: Sourcing and work through the whole Bible in order. Each chapter builds on the last, and by the time you get back here, you'll hopefully have a lot fewer contaminated bags to deal with.