Sterilization Is Non-Negotiable
Everything up to this point. sourcing clean grain, nailing the hydration. has been about reducing the microbial load on your substrate. Sterilisation is where you eliminate it. Not reduce it, not suppress it: eliminate it. Every bacterium, every fungal spore, every endospore sitting dormant inside those rye kernels has to die. If even a fraction survive, they'll wake up in the warm, moist, nutrient-rich environment of your grain bag and outcompete your mycelium before it has a chance to establish.
I've never met a successful grain grower who cuts corners on sterilisation. The people who lose bags consistently are almost always the people who think 90 minutes is "probably fine" or who don't verify their pressure gauge. This chapter is about doing it properly. not because I'm pedantic, but because the data leaves no room for debate.
Sterilisation Failure Costs
Average bags per failed PC run (contamination): 4-5 bags
Cost per failed run: £7.40-9.25 + 3-4 hours labour
Annual cost at 10% contamination rate (200 bags/year): £37-46 in materials alone
Annual cost at 3% contamination rate: £11-14
The difference between a sloppy protocol and a tight one pays for itself in weeks.
Pressure Cooker Selection
This is one of those areas where spending more upfront saves you money and frustration for years. I've used three different pressure cookers extensively, and the differences are significant.
Presto 23-Quart (Budget Champion)
The Presto 23 qt is the workhorse of the home mushroom cultivation world, and for good reason. It's affordable (£80-120 depending on where you find it), it holds 4-5 standard grain bags, it reaches 15 psi reliably, and replacement parts are readily available. I ran a Presto for my first two years and produced several hundred bags with it.
The downsides are real, though. The Presto uses a weighted jiggle-type pressure regulator. It works, but it loses steam continuously through the weight, which means the pressure fluctuates slightly throughout the cycle. More importantly, the seal is a rubber gasket that degrades over time. expect to replace it every 12-18 months with regular use. When the gasket starts to go, you'll notice the PC taking longer to reach pressure and struggling to maintain it. Replace it immediately. A failing gasket means your PC isn't holding 15 psi for the full cycle, and your sterilisation is compromised.
The aluminium body is the other concern. Aluminium is reactive and will pit over time, especially if you're running the PC multiple times per week. My first Presto developed noticeable pitting on the interior after about 14 months. It still functioned, but the surface was rough enough that cleaning between batches became more involved.
All American 921 (25-Quart, the Upgrade)
After my Presto, I moved to an All American 921 and immediately understood why people rave about them. The All American is a metal-to-metal seal. no rubber gasket. You clamp the lid down with wing nuts and the machined surfaces seal against each other. This means no gasket degradation, no replacement parts, and a consistent seal cycle after cycle. My All American holds 15 psi with virtually no fluctuation for the entire run.
The body is cast aluminium, significantly thicker than the Presto. The heat distribution is more even, the pressure comes up more smoothly, and the whole unit feels like it'll outlast me. The price is the catch: £280-350 for the 921, which is 3x the Presto. But given that it'll last decades with basic care, the per-cycle cost is actually lower than the Presto if you're running batches regularly.
Pressure Cooker Comparison
All American 921: £280-350, holds 5-6 bags, metal-to-metal seal, gauge regulator
Presto lifespan (heavy use): 2-4 years before pitting/gasket issues become annoying
All American lifespan: 15-25+ years
My recommendation: Start with a Presto. If you're still growing after a year, upgrade to All American.
What About Instant Pots and Electric Pressure Cookers?
No. Hard no. Electric pressure cookers. Instant Pots, Ninja Foodis, and similar. typically max out at 11-12 psi. That is not 15 psi. The relationship between pressure and temperature is not linear: 15 psi gives you 121°C at the steam phase, which is the temperature required to kill bacterial endospores (the most heat-resistant biological structures you'll encounter). At 11 psi, you're at roughly 116°C. That 5°C difference means endospores survive. I've seen people claim success with Instant Pots, and I believe some of them. if your grain is very clean and your inoculant is vigorous, you might get away with it for a while. But the data on endospore survival at sub-121°C is unambiguous: some will survive, and eventually they'll catch up with you.
Loading Technique
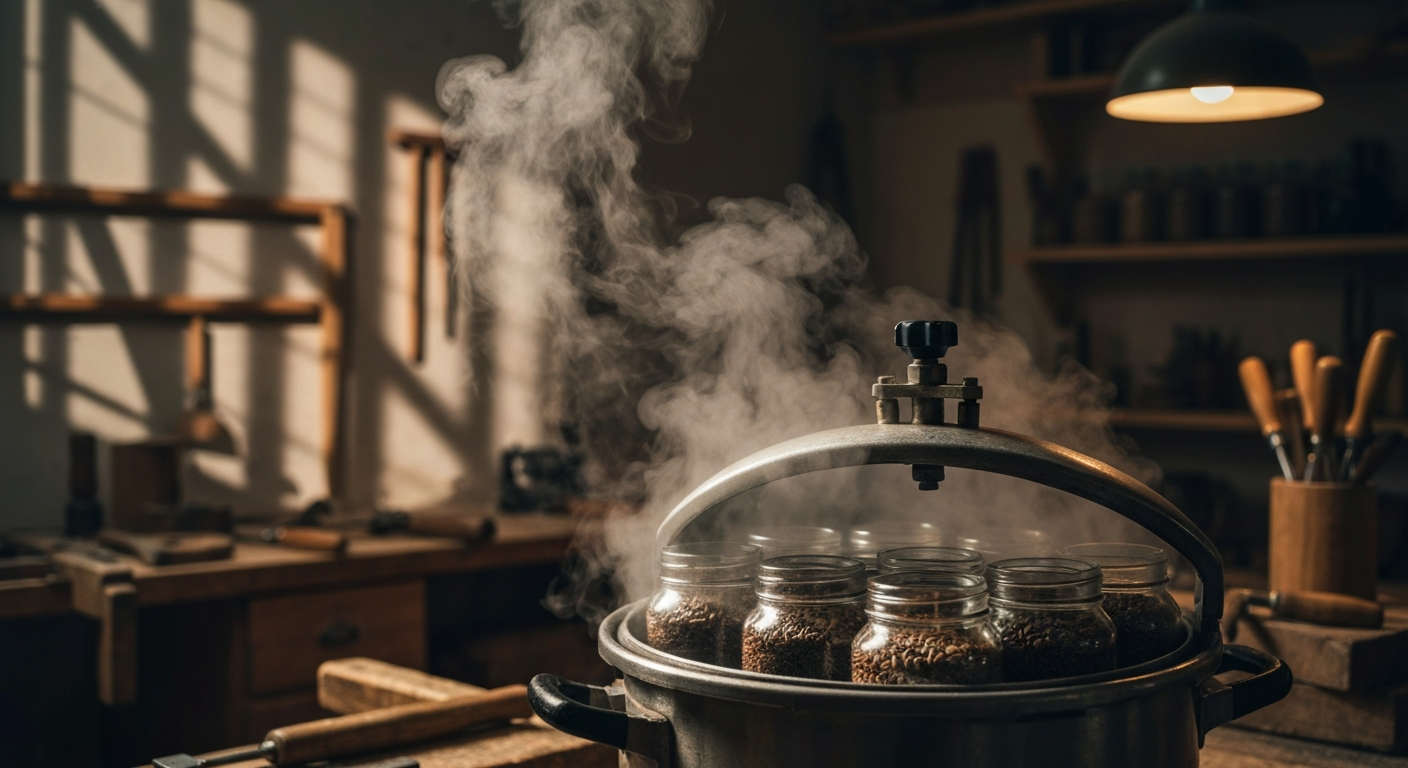
How you load the pressure cooker matters more than most people realise. The goal is to ensure steam penetrates every bag evenly for the full cycle duration. Poor loading creates cold spots where steam can't circulate, and cold spots mean surviving contaminants.
Bag Preparation
I use autoclavable polypropylene bags with a 0.2 micron filter patch (Type 14A or equivalent). Each bag gets 1.1 kg of dry grain (which is roughly 1.5-1.6 kg after hydration. the water weight adds up). The bag is sealed with an impulse sealer, leaving 2-3 cm of headspace above the grain. This headspace is important: it allows steam to circulate inside the bag during sterilisation and gives the grain room to expand slightly under heat.
Before sealing, I fold the top of the bag over once and crease it firmly, then seal through the fold. This double-layer seal is more robust and less likely to fail under the expansion and contraction of the sterilisation cycle. A single-layer seal works, but I've had a few pop open during cooling, and a breached seal means the bag is potentially contaminated the moment air rushes back in.
Stacking in the PC
Place bags upright in the PC, not laying flat. Upright bags allow steam to flow around all surfaces. If you're stacking (which you will be in a 23 qt PC with 4-5 bags), offset the upper bags so they sit in the gaps between the lower ones rather than directly on top. Think of it like stacking bricks. you want an interlocking pattern, not a solid wall.
Never pack the PC so tightly that bags are pressed against the walls. Leave at least 2 cm of clearance between the bags and the PC wall. The wall is the hottest surface and direct contact can melt the polypropylene bag. More importantly, a tightly packed PC restricts steam circulation. Steam needs to flow freely around and between the bags to ensure even heat distribution.
The Foil Trick
I wrap a layer of aluminium foil loosely around the top of each bag before loading. This protects the filter patch from condensation dripping off the PC lid during cooling, which could saturate the filter and create a contamination pathway. It also prevents bags from fusing together if they touch during the cycle. Cheap insurance. costs pennies per batch and saves the occasional bag.
Water Level
Add water to the PC before loading the bags. How much depends on your cooker, but the principle is the same: you need enough water to generate steam for the full 120-minute cycle without running dry. Running a PC dry is dangerous (risk of warping, melting, or in extreme cases, explosion) and obviously ruins the sterilisation.
For my Presto 23 qt, I use 3 litres. For the All American 921, 3.5 litres. These amounts leave me with roughly 500 ml of water remaining at the end of a 120-minute cycle. enough margin for safety without excessive steam loss. If you're unsure, do a test run with water only (no bags) and measure what's left after 120 minutes at 15 psi. You want at least 400-500 ml remaining.
The 15 psi × 120 min Protocol
This is the protocol. Not a suggestion, not a starting point. this is what works.
Step by Step
- Load bags and water as described above. Secure the lid according to your PC's instructions.
- Heat on high with the pressure valve/weight open. Let steam vent freely for 10-15 minutes. This purges the air from inside the PC. Air is a poor heat conductor compared to steam, and trapped air pockets create cold spots. The venting step is not optional.
- Close the valve/place the weight. Pressure will begin to build.
- Watch the gauge. When it reaches 15 psi (the Presto weight will start rocking vigorously; the All American gauge will read 15), note the time. This is minute zero of your sterilisation cycle.
- Reduce heat to maintain 15 psi. On a gas hob, this usually means reducing from high to medium-low. On electric, it depends on your hob. you'll need to experiment. The pressure should hold steady with the weight rocking gently (Presto) or the gauge sitting at 15 (All American). Wild fluctuations mean your heat is too variable.
- Maintain for 120 minutes. Stay nearby. Check every 15-20 minutes. If pressure drops below 15 psi, increase heat and note the time. you may need to add extra minutes to compensate.
- After 120 minutes, turn off the heat. Do not open the valve. Do not quick-release. Do not touch the PC. Let it cool naturally.
Never Quick-Release a Grain PC
Quick-releasing the pressure (opening the valve while the PC is still hot) causes a sudden pressure drop. This makes the water inside the grain bags flash to steam, which can burst bags, blow out seals, and spray boiling grain water everywhere. It also sucks unfiltered air into the PC through the vent, potentially contaminating your freshly sterilised bags. Natural cooling only. Every time. No exceptions.
Cooling Overnight
Natural cooling takes 6-10 hours depending on ambient temperature and PC size. I run my PC in the evening and leave it sealed until the following morning. The grain bags spend the night in a sealed, sterile environment, cooling gradually to room temperature.
Some growers pull bags out as soon as the PC has depressurised (gauge reads zero). I don't recommend this for two reasons. First, the bags are still very hot. 60-80°C internally even when the PC gauge reads zero. Handling hot bags risks burns and bag damage. Second, pulling hot bags into ambient air means they're cooling in an uncontrolled environment where airborne spores can settle on the filter patches. Inside the sealed PC, the air is still sterile. Why would you remove them from a sterile environment before you need to?
My protocol is simple: PC goes on at 7pm, reaches pressure by 7:30pm, finishes the cycle at 9:30pm, and I open it the next morning around 7am. The bags are room temperature, fully cooled, and ready for inoculation. This overnight cooling adds zero effort to my workflow. I'm asleep for most of it.
The Towel Method
In winter, my garage can be 4-6°C overnight. Rapid cooling through a large temperature differential can cause condensation inside the bags, which creates wet spots on the grain surface. I drape a heavy bath towel over the PC after turning off the heat. This slows the cooling rate and reduces condensation. It's not essential, but I've noticed fewer wet-spot issues in winter since I started doing it.
The 90-Minute vs 120-Minute Data
This is the section I wish I'd had when I started, because it would have saved me from one of my worst contamination events.
Many guides recommend 90 minutes at 15 psi for grain. The logic is sound on paper: Bacillus endospores, the most resistant biological contaminant in grain, are killed in 15-20 minutes at 121°C (15 psi). So 90 minutes should be overkill, right?
In theory, yes. In practice, there are variables that theory doesn't account for. The steam has to penetrate through the grain inside the bag. The centre of a 1.5 kg grain bag reaches 121°C significantly later than the surface. Cold spots from imperfect loading add uncertainty. Pressure fluctuations during the cycle. even small ones. reduce the effective sterilisation time. And the grain itself isn't a uniform medium: some kernels are denser than others, some have more internal moisture, some have cracked surfaces where endospores can hide in protected crevices.
After losing 12 bags to trich in one week. all from the same PC run. I investigated. Everything looked right: good grain, proper hydration, clean technique. The only variable I could identify was that I'd been running 90-minute cycles. I switched to 120 minutes and tracked the results rigorously over the next four months.
Contamination Rate: 90 min vs 120 min at 15 psi
120 minutes (4 months, 94 bags): 2.1% contamination
Same grain source (agricultural feed merchant)
Same hydration protocol (cold soak, 18-22h, 10-15°C)
Same pressure cooker (Presto 23 qt, verified gauge)
Same inoculation method (liquid culture, SAB)
A 90-minute cycle gave me 7% contamination. A 120-minute cycle dropped that to 2.1%. That's more than a threefold improvement from adding just 30 minutes to the cycle. The extra 30 minutes costs me perhaps £0.15 in gas and zero additional labour (I'm not standing over the PC for those 30 minutes). The return on that investment is enormous.
I've since spoken with other experienced growers who've done similar comparisons, and the consensus is the same: 120 minutes is the standard. The 90-minute cycle works most of the time, but "most of the time" isn't good enough when you're preparing 20+ bags per week. The 120-minute cycle works virtually all of the time.
Batch Planning
Once your protocol is locked in, the question becomes: how do you scale it efficiently? Running one PC load at a time is fine when you're starting out, but if you're preparing 15-20 bags per week, you need a system.
My Weekly Workflow
I prepare grain in cycles that align with the natural rhythm of the protocol:
Weekly Batch Schedule (20 bags)
Tuesday 8pm: Soak 5.5 kg grain (Bucket B). Drain Bucket A, surface dry.
Tuesday 9pm: Load PC with Bucket A bags. Start cycle.
Wednesday morning: Open PC. Bags from Bucket A ready. Drain Bucket B.
Wednesday 9pm: Load PC with Bucket B bags. Start cycle.
Thursday morning: Open PC. Bags from Bucket B ready.
Repeat cycle for Buckets C and D through Thursday-Friday.
Total: 4 PC runs = 20 bags, spread across 4 evenings with minimal active time.
The key insight is that soaking and sterilisation can overlap. While one batch is in the PC overnight, the next batch is soaking. The bottleneck is always the pressure cooker. you can only run one load at a time (unless you have two PCs, which I eventually bought). By staggering your soaks, you can run the PC every evening and have fresh bags every morning.
Multiple Pressure Cookers
If you're doing serious volume (30+ bags per week), a second pressure cooker pays for itself quickly. I run both PCs simultaneously on separate hob rings. That doubles my throughput with only marginally more effort. the loading and unloading takes the same time either way, it's just the monitoring that doubles (and with the All American's stable pressure, even that is minimal).
Common Pressure Cooker Problems
PC Won't Reach 15 psi
Check the gasket first (Presto). If it's more than 12 months old and used regularly, replace it. they're about £12 and take 60 seconds to swap. Check the safety valve isn't clogged. Check that the lid is properly seated and all clamps are secure. If everything looks right and the PC still won't reach 15 psi, your hob might not be putting out enough heat. Electric hobs, especially older ones, sometimes can't sustain the BTU output needed for a full 23 qt PC.
Pressure Fluctuations During Cycle
Small fluctuations (14-16 psi) are normal with a Presto. the weighted regulator rocks on and off by design. With an All American, pressure should be rock-steady once you've dialled in the heat. Large fluctuations (dropping below 12 psi or spiking above 18 psi) indicate a problem. either the heat source is inconsistent, the seal is leaking, or the safety valve is venting intermittently. Diagnose and fix before running another load.
Water Running Low
If you're consistently ending cycles with very little water remaining, either you're not adding enough at the start or your PC is losing steam faster than expected (gasket/seal issue). Add more water and investigate the seal. Running a PC dry can damage the base, warp the seal surface, and in the worst case, cause a pressure failure. Not worth the risk.
Gauge Verification
If you're using a PC with a pressure gauge (All American), verify the gauge annually. An inaccurate gauge means you think you're at 15 psi when you might be at 12 psi. Some agricultural extension services will test pressure gauges for free. Alternatively, you can buy a replacement gauge for about £20. cheap peace of mind. The Presto's weighted regulator doesn't have this problem (it's either rocking at 15 psi or it isn't), which is one point in its favour.